Category: Latest

The latest news from the Joomla! Team

  • Lazy Load Images

    The lazy load script is a great way to save bandwidth and load your pages much faster. Images that are not visible on the initial page load are not loaded or downloaded until they come into the main viewing area. Once an image comes into view it is then downloaded and faded into visibility. Scroll down this page to see the script in action.

    Setup is very easy! By default this script is disabled, in order to enable it simply choose All Images or Individual Images from the drop down, as shown below from inside the template configuration page.

    All images will load every standard image on the page with lazy load. There is no extra configuration or extra code to add with this configuration, it will just happen automatically. Individual images would be used if you want only certain images to load with this script and not all of them. To do this simply add class=”s5_lazyload” to the image like so:

    <img class="s5_lazyload" src="http://www.yoursite.com/image.jpg"></img>

    This script is compatible with Firefox3+, IE8+, Chrome14+, Safari5.05+, Opera 11.11+

    See the script in action:


  • IE7 and 8 CSS3 Support

    This template includes limited support of CSS3 for IE7 and IE8. With the power of css3, websites can now be built much faster and with far
    less code. Design features such as gradients or shadows that used to be
    created and then called as images on the page are now simply called
    by css code. Transition effects that used to require full javascript libraries can
    now be called with less than 1kb of text. Rounded corners that used to
    require upwards of eight wrapping div elements can now be done with a
    single element. What does this mean for you? Simple, a lightning fast website,
    that becomes even more search engine friendly.

    Many modern browsers such as Firefox4 of IE9 already support CSS3 natively, but where does that leave IE7 and IE8? Thankfully a great solution called CSS PIE (Progressive Internet Explorer) has been introduced and is integrated into this template. Simply put, CSS PIE a script that upgrades IE7 and 8 to support most CSS3 formatting. There are slight variations and some CSS3 formatting isn't supported, but overall it does a great job and allows us to extend CSS3 support to IE7 and 8.

  • Menu Scroll To Section

    This template includes a scroll to feature that will scroll your page to a specified section of your site. All you have to do is create an external link in your menu manager and then in the URL area enter in any ID on your page. You can reference any of the following IDs in order:

    • #s5_header_area1
    • #s5_top_row1_area1
    • #s5_top_row2_area1
    • #s5_top_row3_area1
    • #s5_center_area1
    • #s5_bottom_row1_area1
    • #s5_bottom_row2_area1
    • #s5_bottom_row3_area1
    • #s5_footer_area1

    Screenshot of admin area of an external menu item with DIV reference entered:

  • Fixed Side Tabs

    This template includes a “Fixed Tab” option that you can enable and publish on your site and will show in a fixed position on either the left or right side of the screen. The great feature about the fixed tabs is that you can enter any text you desire and the text is automatically flipped vertically! This is great for search engines to read your text and also saves the hassle of creating an image with vertical text and placing it on the side of your site. The tabs are published site wide and can have the following options that can be changed via the template parameters area and can link to any URL that you desire.

    The following is a quick list of features:

    • Change background to any hex color
    • Change the border to any hex color
    • Change the font to any hex color
    • Set vertical position of each tab
    • Set the height of each tab
    • Set each tab to either the left or right of the screen
    • Add a class to each fixed tab to enable s5 box or perhaps a lightbox or other 3rd party extension
    • Add a URL to each fixed tab so onclick the URL loads
    • Enter any text you desire
    I like what I see! I want to JOIN TODAY.
  • CSS Tableless Overrides

    This template comes with CSS tabless overrides for the main Joomla content, overriding the default table layout. This makes your content much more accessible to search engines.

    I like what I see! I want to JOIN TODAY.
  • Google Fonts Enabled

    Do you want your own custom font? Not a problem, this template comes with Google Fonts enabled, allowing you to pick from over a dozen font families for your website. In the template parameters area of the template you can choose your own custom font, and preview it from the Vertex interface. Below are some examples of the fonts available.

    I like what I see! I want to JOIN TODAY.

  • Template Specific Options

    This template is built on the very powerful S5 Vertex Framework, which comes packed with amazing features! Learn More About Vertex…

    Every template built on Vertex also comes with it's own unique template specific options applicable to that particular template such as highlight colors, social icons, and much more. These features are in addition to the standard functions of Vertex, and are still controlled through the very user friendly interface of Vertex. This page will document the features specific to this template.

    Template Specific Configuration Interface of Vertex

    Below is a screenshot that shows all the template specific features available in the user friendly Vertex admin:

    Custom Highlight Color

    Need your own custom color scheme? Not a problem, this template comes with ultimate color control! With a highlight color of your choice you can set titles, hyperlinks, buttons, backgrounds, and much more to any color you wish! This color can easily be set in the template configuration area. Below are some examples of custom color schemes created through the highlight color option. Below are some screenshots of this effect.

    Custom Highlight Font

    Choose a custom highlight font powered by Google fonts. This font controls most titles, menu items, and several links on the site. You can also change the default font under the General tab of Vertex.

  • Multibox

    Features:

    • Supports a range of multimedia formats: images, flash, video, mp3s, html!
    • Auto detects formats or you can specify the format
    • Html descriptions
    • Enable/Disable page overlay when multibox pops up (via template parameters)
    • Enable/Disable controls (via template parameters)
    • Images Example


      Image #1. It can support html.


      Image #2. It can support html.


      Image #3. It can support html.

      Separeate Group Images Example


      Image #1. It can support html.


      Image #2. It can support html.


      Image #3. It can support html.

      Video Example:


      Youtube.com Video – CLICK ME

      UP: Carl and Ellie

      You can use the following video formats: flv, mov, wmv, real and swf. Just insert the URL to the videos in the href of the hyperlink, here is an example of how we did this for a Youtube video:

      YouTube Tutorial: Simply right click on a youtube video and copy the embed code, then paste into a text editor and look for the embed src and use that URL in your hyperlink.

      MP3 Example:

      MP3 example – CLICK ME

      mp3 example

      iFrame:

      iFrame/HTML Example – CLICK ME

      getfirebug.com

      I like what I see! I want to JOIN TODAY.

  • Search Engine Optimized

    SEO – Get your site noticed!

    Not only is this template beautifully designed but it is great for search engine optimization as well! What is SEO? It is simple the act of altering a web site so that it does well in the organic, crawler-based listings of search engines such as google.com. How does this template accomplish this? It's simple, the majority of your most valuable content is found in the main body of your site, through css we are able to alter the layout of the site and call the main content before the left and right columns are called. This allows for your content to be found first by search engines before it reaches your other content, which is vital in search engine optimization. This is a common feature this can be done with almost all of Shape 5 templates as well.


    I like what I see! I want to JOIN TODAY.
  • Login and Register Setup

    The S5 Box can be demo'd by clicking on either the Login or Register buttons found towards the top of this page.

    The module allows for up to 10 different S5 Box's on one page all via 10 module positions. You simply add a class to any HTML element on your site and enable the corresponding box and you are good to go!

    To enable the login and register modules:

    1. Install the S5 Box module and publish it to all pages on your site. Try to publish it to a position where a module already exists on all pages, but don't worry it won't change the layout of your site, the script is automatically hidden on your site.

    2. Install and publish the S5 Register module to the 'register' module position

    3. Publish the default Joomla login module to the 'login' module position.

    4. In your template parameters area of Joomla you can change the text for login, register and logout.

    5. That's it, you're all done!


    If you do not wish to use the S5 Box but would still like to use the Login and Register links then simply complete step 4 above and also fill out your own custom urls just below those fields in the template configuration. Filling out the custom url fields will disable the S5 Box.

    The S5 Box runs off of the jQuery Javascript library in a no conflictions mode so you should not receive any problems with other third party extensions you may be running on your site. Alternatively you can also the core Joomla mootools script.

    Features:

    • Powered by no conflict mode jQuery Javascript or mootools
    • Choose, elastic, fade or none for the popup effect
    • Up to 10 S5 Box's throughout your site or on any one page!
    • Set the percentage of width of each box according to overall screen size


    Tutorial on how to get the s5 box working and use all 10 module positions it includes

    1. Adding the S5 Box positions:

    • Open up the templateDetails.xml file included with the template you are using.
    • Locate the positions area.
    • Start adding new positions s5_box1, s5_box2, s5_box3, etc all the way up to s5_box10.

    2. Adding the S5 Box classes:

    • The S5 Box class name of the corresponding position must be added to the link that will open the box. For example the following code will display a link that says Click Here and will open the S5 Box and display whatever module is published to the s5_box3 module position:

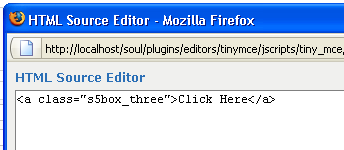
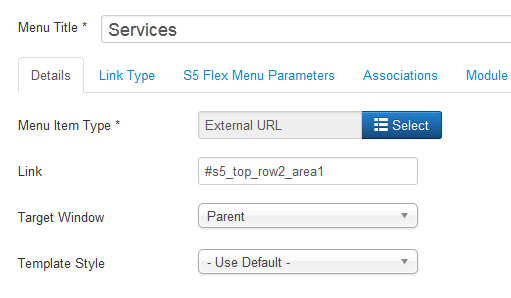
    • These classes can be added to any element, ie: divs, spans, etc., but the common use will be to add this into content with a link similar to the one shown in the picture above. To enter this link you must do so from the HTML edit screen on your content editor:

      Once you have clicked the HTML button the HTML code window will appear much like the first image.

    • You can continue adding these classes throughout your site just be sure to have published a module to the corresponding position or the box will not work correctly. So if you add the class s5box_two you will also have to publish a module to the s5_box2 position.
    • Module positions and their corresponding classes:

      s5_box1 = s5box_one
      s5_box2 = s5box_two
      s5_box3 = s5box_three
      s5_box4 = s5box_four
      s5_box5 = s5box_five
      s5_box6 = s5box_six
      s5_box7 = s5box_seven
      s5_box8 = s5box_eight
      s5_box9 = s5box_nine
      s5_box10 = s5box_ten

    3. Lastly, publish your modules to the S5 Box positions:

    • Now that you have added the s5 box positions just go to your site modules area and publish modules to those positions
    • Make sure that you have added a class to an HTML element as described above or the s5 box will have no activation button
    • Also make sure to publish the actual s5 box to a non s5 box position, perhaps publish it to the “debug” position or a similar one in your template.

    Main S5 Box Module Settings:

    • In the backend of the S5 Box module you can adjust the width of each box independent of each other.
    • Make sure that the S5 Box module is published to all pages, it can be published to any template position. Also make sure that the module opening in the box is published to the page the link is on.